
Your first Svelte component
Svelte.js is a modern JavaScript framework that makes building user interfaces (UI) easy and efficient. Unlike React and Vue, Svelte does things differently by shifting much of the work from the browser to the build step. This means it compiles your app to vanilla JavaScript at build time, eliminating the need for a virtual DOM and resulting in highly optimized code.
In this guide, we will build a simple component using Svelte, learn its basic concepts, and understand why it’s gaining popularity among web developers.
What You’ll Need:
- Basic knowledge of HTML, CSS, and JavaScript.
- A code editor (like VSCode).
- Node.js and npm installed on your machine.
Let’s get started by setting up your environment and creating your first Svelte component!
Step 1: Setting Up Your Svelte Project
First, you need to set up a Svelte project. The simplest way to do this is by using the npm package manager.
-
Create a new folder for your project and navigate to it using your terminal:
mkdir my-svelte-app cd my-svelte-app -
Run the following command to scaffold a new Svelte project:
npm create vite@latest -
Enter a ”.” for the project name to scaffold a project in the current directory.
-
Choose “Svelte” from the list of templates using
↑and↓keys when prompted by the terminal. -
Choose “JavaScript” as we will use it in this article.
-
Install the dependencies:
npm install -
Run the development server:
npm run devYour new Svelte app is now running on
http://localhost:5173/. Open this URL in your browser, and you should see the default Svelte with Vite page.
Step 2: Understanding the Svelte Component Structure
In Svelte, components are .svelte files that contain three key sections:
- HTML Markup
- JavaScript Logic
- CSS Styles
Each of these sections is written within the same file, making Svelte very intuitive and easy to maintain.
Let’s take a look at a basic Svelte component.
Step 3: Creating Your First Svelte Component
Navigate to the src directory and open App.svelte. Replace it with following:
<script>
    let name = 'world';
</script>

<main>
    <h1>Hello {name}!</h1>
</main>

<style>
    h1 {
        color: purple;
    }
</style>
Breakdown of the Code:
<script>block: This is where you define your component’s logic. Here, we declare anamevariable initialized with"world".- HTML block: Inside the
<main>tag, we use curly braces{}to display the value of thenamevariable. <style>block: This is where you define styles that will apply to the component. The styles are scoped to the component by default, meaning they won’t affect other parts of your app.
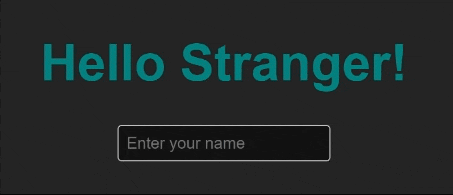
Step 4: Modifying the Component
Now, let’s modify this example to create a custom component that greets the user based on their input.
- Modify the content of
App.sveltewith the following:
<script>
    let name = '';
</script>

<main>
    <h1>Hello {name || 'Stranger'}!</h1>
    <input placeholder="Enter your name" bind:value={name} />
</main>

<style>
    h1 {
        color: teal;
        font-family: sans-serif;
    }

    input {
        padding: 8px;
        font-size: 1em;
        border: 1px solid #ccc;
        border-radius: 4px;
    }
</style>
What’s Happening Here:
- We’ve created a two-way data binding with the
<input>field usingbind:value={name}. This means whenever the user types something into the input field, the value ofnameupdates in real-time. - If the input is empty, the heading will display “Hello Stranger!” instead of an empty string, thanks to the logical OR operator (
name || 'Stranger').
Step 5: Adding More Components
In Svelte, it’s easy to create reusable components. Let’s create a new component called Greeting.svelte that handles the greeting message.
-
Create a new file in the
srcfolder calledGreeting.svelte. -
Add the following code to
Greeting.svelte:
<script>
  export let name = 'Stranger';
</script>

<h1>Hello {name}!</h1>

<style>
  h1 {
    color: coral;
    font-family: 'Arial', sans-serif;
  }
</style>
In this component:
- We are using
export let name = 'Stranger';to make thenamevariable available as a prop when this component is used elsewhere. - The greeting will default to “Hello Stranger!” if no name is passed.
- Use the new component in
App.svelteby importing it:
<script>
  import Greeting from './Greeting.svelte';
  let name = '';
</script>

<main>
  <Greeting {name} />
  <input placeholder="Enter your name" bind:value={name} />
</main>

<style>
  input {
    padding: 8px;
    font-size: 1em;
    border: 1px solid #ccc;
    border-radius: 4px;
  }
</style>
Now, whenever you type a name in the input field, the Greeting component will update accordingly.
Step 6: Conclusion
Congratulations! You’ve just built your first Svelte component, learned about two-way data binding, and created a reusable component. Svelte’s simplicity, combined with its performance advantages, makes it a great choice for building modern web applications.
This is just the beginning—Svelte has many more powerful features such as reactive statements, stores, transitions, and animations that you can explore as you dive deeper.
By following this guide, you’ve taken the first step toward mastering Svelte. Happy coding!
Feel free to experiment with your project by adding more components, styles, and logic. Svelte’s clean and intuitive approach will make the learning process both fun and rewarding.